Showing posts with label Stamps. Show all posts

June 15, 2014

Father's day cards

A few father's day card ideas. I made them last night, and were very easy to make. Most of them with paper scraps.


- The stars are made from cork, didn't have veneer, but I wanted to add some embellishment and stars are very easy to make (specially irregular ones)


- Here I stamped the "faher's day" wrong, so to pretend it was intencional y stamped the other part in diagonal too. Thie perls were made with liquid perfect perls.


- some random watercolor with distress, red pearls over watercolor paper and craft paper


-This PAPA letters were the positive cutout from the next card that I wraped with washi tape and finished with glossy accents


- Negative cutout popped with foam tape over a watercolor paper gradient made with distress inks. The dots are studs and the black cardstock was actually white and handpainted it with copic marker, so the inside is white and the front is black


May 2, 2014

Latest cards

To all my readers, I'm very sorry that I haven't post anything in the last few months, BUT there's a good reason.... Moved back to Panama, buy a house, we are working on many home improvements and above all and the most important reason is that I'm 6 month pregnant now 😁 of our first baby!!!!
I'd like to thanks all of you for your support and constant messages I'm expecting to finish my working studio soon but on the mean time here are some projects that I've been working on.

Please leave a comment or send me a message, I'm working secretly with some friends to prepare a giveaway soon, so stay tuned!


 - Kind of Tim Holtz inspired card.
Used lots of distress ink, embossing folder, bird die and hand cut banner with sentiment. Very simple.

- Embossing folder, gift stamp, versamark for watermark on pink paper, glossy accent for bow, copic markers and vellum with sentiment.

March 22, 2013

Lovely Postcard


Love is in the air. With my hubby everything is great. Next weekend is our monthly anniversary :) So I made this postcard for him. Pattern Play uses lots of beautiful patterns and I wondered if I could make my own. Guess what, I can and so do you.  I'll be sharing some techniques I use for make my own pattern paper. Let's begin.

This first one is super simple, all you need is paper, stamps and embossing powder. I made this one with clear embossing powder, but I'm thinking metallic embossing powder or even clear embossing powder over colored paper to create an incredible tone on tone paper, super "in" right now. 


How to left the perfect space for the word Love in color? You can stamp this first (that would be the easiest way) or calculate placing the stamp over the card and stamp it next to it and go from there up, down, and side by side... I finished it with baker's twine. So, how I did? Think I'm getting better :p Share yours on the comments.


March 14, 2013

3-Window Card and Template

Trendy alert! 3-windows on a card either round or square

This can be found on many cards today. There are also many dies that cut out the 3 shapes at the same time, but if you don't have this die, like me, you can download this pattern that will fit a 5.5" x 4.25" card (landscape or portrait). You can use this template for circles too.


1. I used coordinated patterned paper. 2. Cut out the template and cut out some stripes of paper. 3. Draw the template on the back. 4. Cut out as shown. 5. Transfer the template to the card. 6. Stamp your images into the card.


I stamped the sentiment at the bottom and use baker's twine in blue to contrast (look for additional colors on patterned paper or on the coordinates on the same pad). You can color your images or not.

Download the pattern below (at the end) and share your creations! Just leave a comment with a link to your card. Did you use it rounded or squared? Do you think of any other way to use this pattern? Comment, comment, comment!!! We all want to know what you did :)


Download below!
 
Click to open, right click to download to computer


March 13, 2013

Mini Card or Tag with Scraps

Hello everyone! I've been very busy but I'll be posting all I've been up to! ;)

This is one of the cards I made last week. I meant to make "regular size" card, but the stamp was small and I decided to turn it into a tag, using scraps as color. Never toss any paper bigger than 1cm x 1cm, a smaller size might not be useful (and I said might).


March 7, 2013

Stamp Carving Tutorial - Details


I'm here again with another tutorial on stamp carving. I just want to let you know that it's been less than a year since I started carving stamps, but I think the results are best when done this way. So here we go:


This are my tips when carving small pieces, thin lines or curves:
- MOVE SLOW and use light pressure, the less you remove, the easy will glide and you can fix it (if needed) later.
- I advise to start and end one stroke at a time, when a "line" makes a 90˚ angle STOP, lift your carving tool and rotate your stamp, now continue carving.
- Curves are easy if you rotate the stamp while carving, if you move your hand while making pressure you might not control directions very well.
- If a thin line is "as thin as your tip" carve on top of the line, but if the line is wider, then your carving tool should be placed aligned with one of the borders of the line, then carve the other side.
- If your tip is too big, use a syringe needle!
- I only use an xacto knife to "divide" what I want to carve from what I don't. I lightly press the xacto into the carving block and make sure it get about 1 or 2 mm deep.


Hope this help, please let me know if you have any questions or if you have another method for stamp carving! Share your knowledge : )
The template of the stamp of this video can be found below for free! And a picture tutorial on how to carve your stamps can be found here.


March 4, 2013

For My Mom


Well, this Friday is the International Women's Day but I don't want to wait that long to thank you for stopping by my blog and specially my mom for giving me everything including "super-mom cheers" for every project I do or post or give or show her =p So I dedicated this card (now two) to her. I love u lots mom.


I get the inspiration from Amber at Damask Love, and you can see the link here. Sometimes you see a card and instantly picture something else, well that's what happened to me when I saw Amber's card. I don't have many flower stamp (weird right?) so I decided to make my own.


For everyone that wants to carve a stamp I recommend you to go here, but I'll share a mini tutorial of this petals probably in video next week. Besides carving, I wanted to show you how I made the flowers on the card. I don't have fancy ink or paper, but I'm sure you can achieve such a great results with blending ink or using a resist technique which you can find here thanks to Jennifer McGuire.


Repetition is key! In the video I try my best to place the stamp where I wanted, but in real life I move the paper, here I didn't so the pictures/video came out right. Most flowers are NOT perfect at all, but the final result came out ok. I didn't edit the flowers, so you can see they look super cute. I bet you can do it better with time and patience.

Remember to subscribe to post, the newsletter will be available in two weeks and will be published every two weeks =p.

PS. New changes are coming to my blog, so bear with me. In the time being, you can see some of them and let me know what you think. Also if you want to share your custom carved stamp please leave a comment with the link or email me so I can add it along with your website (if you have one) for everyone to share!


June 8, 2012

Forrest Wonderland Envelope


Yes, it looks kinda sad, but believe me that the colors on this envelope are bright and cheerful. What happens is weather =( It's been raining all day long, but I still wanted to share this picture with you today. It was so dark that even adjusting the brightness on the camera won't help much. I've tried everything, but this is the best I could. This is how I make envelopes now, full of life, and hopefully when my friend get this she will be thrilled before opening it.

If you liked this envelope remember to follow ;)

June 7, 2012

Organizing Stamps

Original Design Mini Stamp Series - Forrest Wonderland Series
As you know, I posted a few days ago about this stamps. Well my husband asked me, How do you remember all the stamps you have? In my head I said: I would never forget! but, let's get real, I have a happy and sad face (that's pretty easy to remember) but I have 3 leafs... hmmm maybe I might forget about one of the leafs, and two size of stars in different sets! So I decided to make a journal or something like that where I can stamp all my mini stamps and keep them organized. For now I'm using old white envelope to store my stamps, but I grab an amazing idea from Sew Many Ways. I will show it to you here. The plastic containers are so obvious! I don't have space for a metallic "mirror" but I do have space in my drawers =)
And I'm sure that with permanent ink like memento or staz-on  you might stamp the plastic container all around!!! yay!!! I'll try it as soon as I purchase the containers. (these are small plastic cups like the ones you get for soy sauce on take out)


Stamp all your stamps on a sheet with the title and how many stamps are
Storage in envelopes, plastic containers or whatever you want.

Attach the proof to your stamps.
Since I don't have too many stamps yet, I have a small cardboard box where you can perfectly fit a 3 by 5" note card. So I'm arranging them this way, and because of the pin at the bottom is easy to pick them up!

Let me know your ideas! Please follow to be up to date on tutorials, organization ideas and more.


June 5, 2012

Mini Stamps - Done!

After 3 hours aprox. I finished the stamps!!! Soooo cute!

I made everything black so you can see them.
I'm thinking of stamping these on the envelope on pastels, but I need to make a white envelope for that =(
Hopefully tomorrow I will share the pictures of the envelope, which means, on thursday I will send my cupcake stamp and other gifts to my friend Ishtar =p

Mini Stamps Series

Carving Stamp block leftover...

I've been obsessed with mini-things. Mini books, mini crochet, mini stamps... I was thinking what to do with this piece of carving block, but because I wanted more than 1 stamp out of it I decided to do as many mini images I could fit in it. I started last night. About an hour later, this is what I've done.

Turned into a series of mini stamps - Forrest Wonderland Theme
I'm still working on the gnome... it's a bit tight but I'm sure it will turn out great. I'm happy to say I'm getting better, I carve faster and more precisely... Practice indeed!!!! I will make this stamp series for an envelope. I know she likes nature and magic creatures, I will post the envelope when it's ready to ship... can't wait!

Remember to sign up for the newsletter!!! A super giveaway is coming soon!


May 20, 2012

More carving Blocks

10 new speedball carving block!!! yaaaaay!!!
I found out an amazing prize on this carving blocks, so I bought them right away. 10 carving blocks, how many stamps can I fit there?? hmmm

I wanted to share with you about the carving tool. Mine has several interchangeable blades. They are numbered from small to large and also include a knife. There are many carving tools outside, but most people recommended this one, besides, it has it's own storage =) Also you can purchase additional blades. I purchased mine here, but if you want, there is a starting kit here. Let's carve together!

Stamp Carving Tutorial


Hot Cocoa: 1cup Milk + 2Tbsp Hershey's Cocoa + 2Tbsp Sugar + Vainilla (optional)


After several weeks recovering from a pool accident... I'm finally back. I was very depress, but a few days ago I was bored and depressed and started crocheting a gift for a friend. So I got my mood back, and started thinking it wasn't that bad. While getting my crafts in order and sorting what's next, I took this picture... According to weather.com it's 18˚C (75˚F) outside, but it feels like 10˚C!!! Since I can't drink coffee or tea, I came up with some delicious Hershey's hot chocolate =)

Hopefully this Friday I start a new series of blog post that includes cards, crocheting, sewing, embroidery and other cool stuff I want to make. I'm thinking to make it once a week: Inspiration Friday, Color-me Wednesday, and so on... Still working on it, but this allows me and you to make different things in just one week. Also I'll try to affiliate with other blogs and website for cooperative work as cards or knitting challenges. Let's see what happens. For the time being, I took this pictures a few days ago with natural light at evening! It started to get dark really quick, but I think you might get this how to... I will post again with new pictures soon. Click here to see what you can do with carved petals!

Tips:
- Use an x-acto knife to make it easier to carve. This must be done lightly!
- Make bold lines, and stamp it down. If there are too bold, carve again. This helps first time carving stampers to handle the carving tool.
- For small areas and details use a syringe needle, very slowly and firm.
- When stamping, use resistant dye ink, this will prevent markers or other ink to smudge your stamping.

UPDATE! Another carving tutorial for details has been post here.

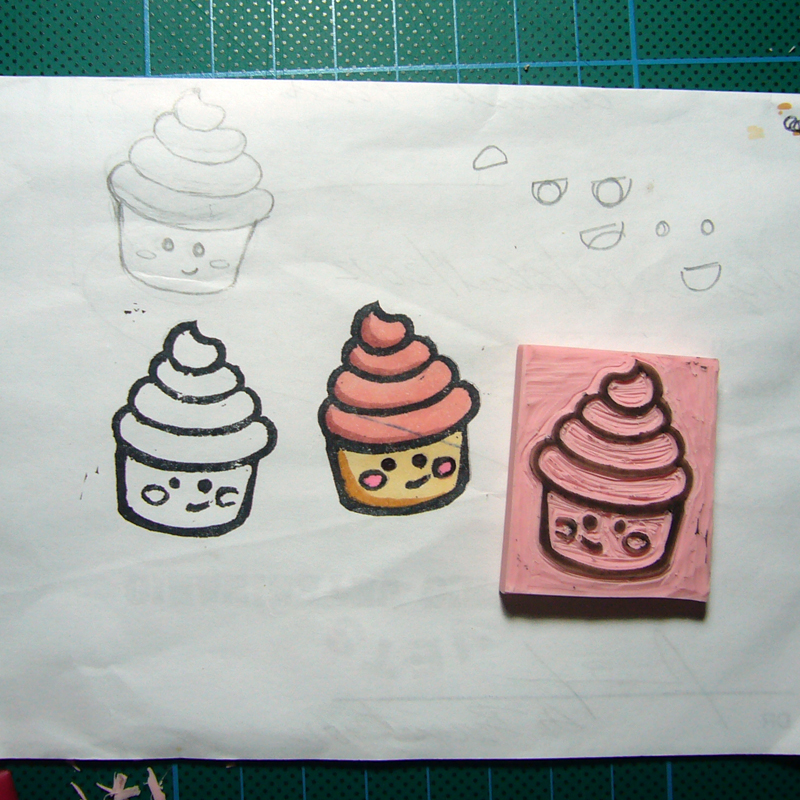
Choose a Design, I looove this cupcake (personal design)

April 19, 2012

MY FIRST STAMP!

Carved Stamp
When I got my tools for carving and the carving block... I draw this cute cupcake and start carving right away. It was 11 pm but I was sooo excited that I carved it in one hour, stamped it and make a set of 4 cards with envelopes at the same time! THAT'S WHY THIS PICTURES ARE SO DARK, but need to share this with everyone, so here is how I did it.


1. DRAW YOUR DESIGN
I decided to make a cupcake.
Cupcake, original design.

Ads Inside Post